Cultured Butter & Buttermilk

We’re making cultured butter and buttermilk here, this is serious stuff. Seriously simple. Seriously. Why would you want cultured butter over regular butter? Cultured butter has good bacteria. You know, probiotics? Good for your gut? Supports immune system? Trims tummy fat? Yeah, that kinda bacteria. The good kind.

If you are fortunate enough to have access to raw milk or cream like I am, congratulations! All the needed enzymes and bacteria are still in place and you need nothing but good ol’ raw cream and a jar with a lid to make cultured butter.
If you don’t have access to raw cream, I am so very sorry. You will need one pint of cream (No additives. Pure, glorious cream. Check the label) and three tablespoons kefir, yogurt, or cultured buttermilk. Not vanilla kefir or yogurt. Pure, plain kefir or yogurt. And a jar with a lid. OR… If you happen to have some creme fraiche looking for a purpose, skip the pasteurized cream and kefir and just use it (and begin at step two, below).
Store raw cream, or pasteurized cream with kefir or yogurt mixed in (see above for amounts) in a very clean glass jar with the lid screwed on well at room temperature. If it’s raw, it only needs to sit overnight (or 12 hours if it’s winter). If it’s pasteurized (I’m sorry again), keep it sitting out for 12-24 hours, depending on how warm room temperature is (less time for warm, more time for cool). Once it starts looking thicker (swish it around a bit to test it’s thickness), it’s butter time.
You can either churn your cultured cream with an electric mixer (if you own a Kitchen-Aid, use the whisk attachment) or a food processor. The food processor seems to take less time, the mixer takes several minutes. The problem I sometimes have with the food processor (mine is eleven years old, so the newer ones might work better), is that it sometimes leaks the precious cream, and that’s just painful for me. Crank the chosen appliance on. Once you start seeing lumps, you have butter! And buttermilk! Ah, buttermilk! It’s all starting to make sense…
Drain the buttermilk into a bowl. Now use a spoon to squeeze any more buttermilk out of the butter and into the buttermilk bowl.
Rinse the butter with cold water and push out the water with a spoon like you did to get the buttermilk out. Continue doing this (rinse and squeeze) until the water that you squeeze out of the butter is clear. If you don’t do this and there’s still buttermilk in your butter, the butter goes rancid. Rancid butter tastes nasty. Rancid = free-radicals. Free-radicals bad. Squish the butter into a glass storage container and pour buttermilk into a glass jar (remember the picture way up at the top? Yep.)
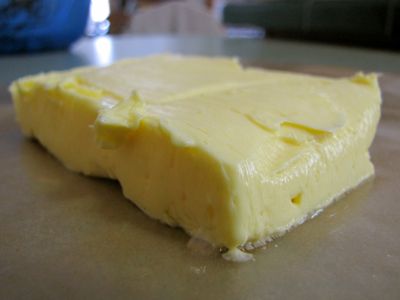
And there you have it, folks! Cultured butter for the cultured foodie. No need to salt it; it’s flavor is perfect by itself. How long will they keep, you ask? It depends on how fresh your cream was. The butter and buttermilk will keep for a few weeks in the fridge if your cream was fresh. Now go! Make some cultured butter! Your tummy will thank you.

Creme Fraiche

Don’t let it scare you. Creme Fraiche (pronounced crem fresh) is basically healthy sour cream. But much fancier. And you can feel extra fancy knowing it is a key ingredient in fine French cooking. It is simpler than simple to make it.

First, pour a little bit of cream in your quart-sized jar.
Now, pour in all the buttermilk.
And the rest of the cream.
Stir it up.
And put a lid on it, already.
Now, just enjoy watching your cream lacto-ferment while you sit by the fire. Or set it someplace warm, like next to the oven for 20-24 hours. If it’s winter, it’ll take longer to thicken. When it’s hot out, it’s ready a lot faster. Then, store it in the fridge and voila! La creme! You made creme fraiche. The amount of thickness is up to you. You can determine the thickness by how long you let it sit out. If you like it somewhat runny, keep it out for about 20 hours. If you like sour cream consistency, keep it out the full 24 (or less if you’re experiencing a sizzling summer in the valley).

Homemade Cultured Butter

Start with cultured cream to make a butter that is sweet and sour with complex, wonderful flavors.

Stir the culture into the cream. Cover the jar with a cloth napkin secured by a rubber band. Leave at room temperature for 24 hours. Then transfer to the refrigerator to chill.
Put the chilled cultured cream in a mixer, food processor, or blender. (Don’t use a Vita-Mix or the mixture will heat up.) Whatever your container is, fill it it to less than half because the cream will expand during the churning.
Turn on the machine. The process of churning may take between 5 and 10 minutes. The cream will go through stages on its way to butter. First, it will expand its volume and become whipped cream. Then the butter solids will start to clump together and separate from the liquid (buttermilk). The whole mixture will appear grainy. Then the solids will clump together even more until you have big chunks of butter floating in buttermilk. Run machine just a minute or so more to complete the process of clumping the butter solids.
Put the butter solids in a bowl. Save the liquid buttermilk for soaking grains (unless it is stinky, which can happen if the cream got very sour).
Repeat with all the cream until all of it is converted into butter solids.
Add cold, clean water to the bowl and use a hard spoon to press and fold the butter into the sides of the bowl. The water will quickly turn clowdy as the remaining buttermilk releases from the butter solids.
Change the water repeatedly. Keep washing the butter until the water stays clear. When the water is clear, you have clean butter! The cleaner the butter, the longer it will last. The washing water isn’t true buttermilk as it is too watered down. It makes good water for animals or the compost.
Pour off the remaining water. Press and fold the butter more to release more water.
Mix in the sea salt.
Transfer the butter to some kind of mold, or you can just shape it into a log or chunks.
Wrap gently in natural wax paper or parchment paper. Put in additional wrappings if desired (to prevent off flavors or freezer burn). Refrigerate or freeze.