A great peanut flavor, slightly sweet and a thin crispy crust on top. Great breakfast or snack, warm or cold. If I forget to start the oats soaking 24 hours in advanced, I throw in ¼ cup rye flour or flakes to speed the breakdown of antinutrients. This recipe is yummy with any nut butter, make your own with soaked and dehydrated nuts for super nutrition.
Soak oats with water and whey for 24 hours. Place in fine strainer, rinse well and let drip for 5 minutes. Meanwhile, combine sugar, butter and peanut butter, mix well. Beat in eggs, salt and vanilla. Carefully thin out with milk, mix in strained oats and pour into a 9 by 13 baking dish, spread evenly and bake at 350 degrees for 25 minutes. Serve with bananas, raisins and fresh whipped cream.
Made from organically grown heirloom dent or flour corn, fresh hominy is a lovely addition to soups, stews or even eaten with unrefined salt and butter for breakfast! The process described here for preparing the corn is called “nixtamalization” and greatly enhances the nutritional profile of the corn. It does take some time, but is not difficult, and if you make a substantial amount all at once and freeze or can the extra, it will be ready to eat when you are!
The night before: Pour dried corn kernels into a large colander. Rinse thoroughly. Remove any ugly or damaged kernels.
Into a 2-gallon heavy-bottomed pot, pour the rinsed corn, add the lime and cover with filtered water half again as deep as the depth of the corn.
Stir. Bring to a boil. Cover and simmer for 30 minutes. Turn off heat. Leave this to sit all night.
In the morning, pour the corn into a large stainless colander and rinse thoroughly.
Fill the cooking kettle with lots of cold water and pour in the corn. Work the corn with your hands, rubbing and stirring and rubbing and stirring. The water will become yellow.
Strain through the colander and rinse.
Repeat this process until the water is clear when you work the corn. It will take about 4 changes of water.
Rinse in the colander again and return to the pot. Cover well with filtered water.
Bring to a boil, put on the lid and reduce heat.
Simmer until the hominy is very tender (approximately 3 hours). Check to make sure it remains submerged in water.
Drain. Serve warm with unrefined sea salt and plenty of butter.
Freeze the extra in meal-sized containers, or ~ hominy may be canned. Consult a canning guide for instructions on how to can safely.
Sweet, crunchy and a quick-grab-breakfast; cereal is an excellent invention. The food industry has really done a number on this convenience food with all it’s extrusion, colors, preservatives and other chemicals and processes. I understand fully that still, it is a hard thing to give up. There are so many varying levels of commitment in a real food journey and once “the box” is gone, you have officially turned a corner in my book.
Preheat oven to 350 degrees. Grind two cups of almonds with one cup of kefir in blender until smooth. Pour mixture into large bowl and repeat with two cups almonds and one cup kefir, pour into bowl. Grind one final batch, this time using two cups peanuts and the final cup of kefir, add this to the large bowl as well. Place oil, honey, salt and vanilla in blender to combine well and add to nuts. Stir the entire batter to combine, sprinkle coconut flour on mixture and mix thoroughly. Pour batter into a half sheet pan (9 x13) and bake for 40 minutes. Let cool and then crumble onto baking sheets or dehydrator trays and dehydrate at 150-200 degrees for 12 - 16 hours. Once cooled, store in airtight container in the refrigerator.
Fried Cornmeal Mush reminds me of my great-grandmother. It was something special she would make for breakfast when we were visiting her. I’ll never forget how the crunchy, salty outside with a warm chewy center tasted in my mouth with the sweet maple syrup. If you’ve never had fried cornmeal mush, you’re in for a treat!
Soak
Cover 1 cup of cornmeal or grits with 2 cups of lime water and allow to soak at least 8 hours, but preferably 24 hours. When done soaking, rinse and drain cornmeal twice. (If using organic masa, skip this step and proceed below, you will likely have to use additional water since your corn did not soak and masa soaks up more moisture)
Butter 3 small loaf pans or 1 large loaf pan. Alternately, you could line them with parchment paper.
Place soaked cornmeal, salt and 2 cups of stock or water in a heavy bottomed medium saucepan. Turn heat on medium. When the mixture begins to bubble, lower heat and stir constantly, adding a little more water or stock if the mixture is getting too thick. You’re looking for the consistency of thick cake batter. Cook the mush for about 5 minutes more once desired consistency is reached.
Pour cooked mush into the loaf pans and allow to cool. Once mostly cooled, store in the refrigerator up to a week or until ready to fry.
To Fry:
Melt a tablespoon or so of your fat of choice in a cast iron skillet set to medium low heat. Un-mold the mush and slice into 1/4 - 1/3 inch slices (I do this as I fry them, rather than all at once because they can be fragile. Also, if you use the large loaf pan, I slice the loaf in half lengthwise first and then make slices.). Fry mush slices in hot oil on both sides for about 3-4 minutes or until golden brown and crisp. Allow to cool and drain on a plate lined with paper towel or cloth. Sprinkle with additional salt if desired.
Serve topped with a drizzle of grade B maple syrup.
*NOTE: I’ve also made this by soaking whole corn kernels in the warm lime water for 24 hours. Rinsing and draining. Then, pulsing in a food processor until the corn is the texture I want. Then cook it into porridge above and proceeding with the rest.
You can probably tell by the name that we think this granola is the bomb! And we’re not kidding around here, it really is! Not only is it absolutely delicious, but it’s soaked for optimal nutrition! This granola also makes a thoughtful homemade gift – simply place it in a mason jar and add a decorative ribbon and gift tag and you have the perfect gift for any occasion!
SOAKING
Place butter and coconut oil in a small sauce pan and heat until melted. Pour into a very large ceramic (or glass) mixing bowl and add coconut milk, water and vinegar; whisk to combine. Add oats and rye; thoroughly combine using a large wooden spoon or rubber spatula. Cover the bowl and place it in a warm area of your kitchen for 24-48 hours. (I use Native Forest brand because they use BPA-free cans. Please note: This recipe will not work with coconut milk beverages, i.e. Silk or So Delicious brands.)
BAKING
After soaking time is completed, preheat oven to 200° F. Place honey, maple syrup, salt, cinnamon, and vanilla in a glass measuring cup. Place measuring cup in a small pot of warm water on the stove. Bring water to a gentle simmer, stirring honey mixture until melted and all ingredients are thoroughly combined. Turn off heat and remove cup from pan carefully, using an ovenmit. Pour honey mixture over oat mixture.
Using large rubber spatula, combine the honey and oat mixtures, until well combined. (Tip: As shown in the step-by-step “How to Make Soaked Granola” photo album, I start working at the edges to pull the soaked granola forward and allow the honey mixture to seep down. Then I keep pressing the soaked oats down using the top of rubber spatula, while turning the oats over and over, until everything is well incorporated.)
Spread the mixture out over two parchment paper-lined, 12×17-inch rimmed-baking sheets. Place baking sheets side-by-side in oven for best results. If you have to stack them, be sure to rotate them during bake time. Bake for 8-9 hours, or until granola is mostly dry and crisp. Then turn off oven and allow to sit in warm oven overnight, as described below.
Tips for crispy, non-clumpy granola: After two hours in the oven, use a large spatula to break up the large flat of granola into small sections by flipping over the granola in small sections. Then use the spatula to break-up the moist granola sections into smaller pieces for faster cooking/drying time. Place back in oven and bake for an additional two hours. Remove from oven and repeat the process; flipping over and breaking the pieces into smaller sections. Keep repeating this process every two hours thereafter, getting the pieces smaller and smaller each time. When granola is mostly crisp (usually after 8-9 hours baking), carefully remove the parchment paper, leaving the granola on the baking sheet. Then, turn off oven and leave baking sheets inside the oven with the oven door closed until completely cooled. The granola will get slightly crispier as it cools.
Remove from oven and transfer cooled granola to a very large bowl and mix in any “add-ins” you’d like (see suggestions below). Makes 10-cups of granola (without add-ins). I recommend storing half in an airtight container in the pantry (stays fresh up to two weeks in the pantry). Store the other half in a freezer-safe container in the freezer up to two months to preserve crispness/freshness.
Serve your homemade granola with chilled raw milk, yogurt or simply enjoy it as a delicious snack!
PLEASE NOTE: I highly recommend taking a look at my step-by-step photo tutorial as it visually displays the the process step-by-step. Please visit the link in the byline at the top of the page to see the tutorial.
*GF Option: If you’re gluten-free you can use buckwheat groats for the soak. You can decrease the amount to 1 cup of buckwheat groats and then use 7 cups of GF rolled oats. The reason you need rolled rye or buckwheat groats is because they contain the phytase necessary to help break down the high levels of phytic acid in oats.
Sprout your brown rice before cooking to increase nutrient availability and mineral absorption. It’s actually not any more difficult than soaking your brown rice.
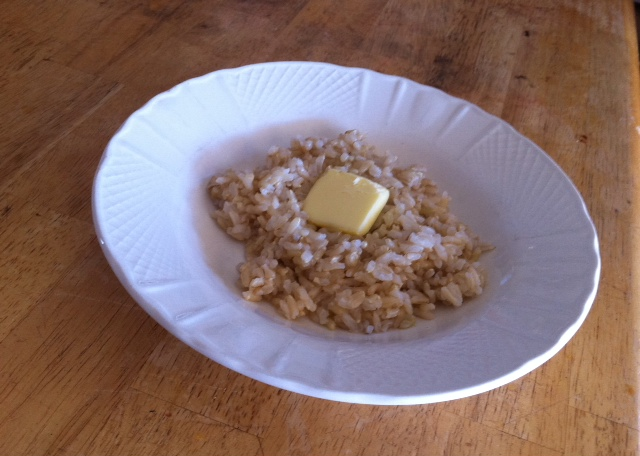
Rinse rice well and place in a bowl or mason jar along with about 4 cups of warm pure water. Cover and let stand on the counter for 4-8 hours.
Drain. Rinse. This time do not refill with water. Cover again and leave on the counter.
Drain and rinse the brown rice in this manner 2 to 3 times a day until you see little tails about 1/4″ long coming out of the end. It usually only takes 2- 3 days.
To cook:
Rinse rice and place in a medium saucepan with 3 cups of water or homemade chicken stock. Bring to a boil. Remove the scum that comes to the top. Boil until water is about the same level as the rice. Cover with a lid and shut off the burner. Allow to sit for 45 minutes to steam. Fluff with a fork and serve.
Our beloved granola is actually not very good for us. Here’s the solution!
Soaked Oat Instructions:
Two days before – In a large bowl, combine rolled oats, warm water and whey or lemon juice. Stir gently to combine. Cover with a kitchen towel and set in a warm place for 24 – 36 hours.
In a fine mesh strainer, rinse well. Gently spread soaked oats evenly onto a dehydrator tray lined with a mesh insert. Dehydrate at 150˚ for 12 hours, until thoroughly dried. Remove and cool.
Once cool, granola may be made immediately, or oats may be stored in an airtight container for several days, ready & waiting for granola preparation.
Granola Instructions:
Preheat oven to 350˚. Locate a non-stick sheet pan or a regular sheet pan lined with parchment paper.
In a small saucepan over medium heat, melt butter. Once nearly melted, add honey, cinnamon, stevia and sea salt. Whisk well to combine.
While butter is melting, crumble oats onto the prepared sheet pan.
No big chunks should remain. Add walnuts, almonds, sunflower seeds, pumpkin seeds and coconut flakes.
Once honey-butter mixture is prepared, evenly pour mixture overtop of oat-nut mixture.
Using a spatula, stir until well combined; ensure every piece of dried oat gets a light coating of butter. Spread evenly before baking for 10 minutes. Remove and stir.
Spread evenly and bake for another 5 minutes. Remove and stir.
Spread evenly and bake for 5 additional minutes, for a combined total of 20 baking minutes.
Remove and immediately stir in currants until well combined.
Cool completely before storing in an airtight container at room temperature for up to a week. Or transfer to the freezer for several months.