A great and delicious way to enjoy your zucchini. Finger foods always seem to be a hit with the kids. My kids especially enjoy eating these dipped in in their favorite dipping sauces. Plus, they don’t complain because they can’t tell so much that they are zucchini.
Mix the ingredients, except the fat, in a bowl.
Warm the fat of your choice in a cast iron skillet over medium-high heat.
Spoon fritter batter into pan with a large spoon. Gently flatten a little, if necessary.
Cook the fritters on each side until they are golden. About 4-5 minutes on each side.
Serve with homemade probiotic ranch dressing to dip in.
Freeze formed, uncooked fritters in a single layer on a cookie sheet. Once hardened, transfer to an airtight container. Cook the same, only it may take and extra minute or so.
A grain-free version of a classic favorite! This is a really tasty dish that satisfies the craving for something hot and cheesy…cauliflower makes a great stand-in for pasta!
Steam cauliflower for 10-15 minutes until crisp-tender, and then drain well.
Melt butter in a saucepan, and then add arrowroot, salt, dry mustard, tarragon, and nutmeg, stirring until bubbly. Slowly whisk in milk, and let the mixture thicken.
Stir in cream cheese and cheese, then turn off heat and add sour cream. Mix with cauliflower, and then pour into a buttered 9×13 baking dish. Mix together almond meal with garlic powder, onion powder, and paprika, then sprinkle on top. Bake at 350 for 30-35 minutes, until browned and bubbly. Serve in bowls or with a slotted spoon, as there is lots of yummy cheese sauce in the bottom of the pan!
For quite some time I’ve been trying to come up with a recipe for my own “chili beans.” We like them best when I make chili, but until now, I’ve always had to purchase the beans in cans. Because of the dangers of BPA that is in the metal can linings, and the fact that I can use organic beans and soak them properly, I am very happy to report that no longer will I need to buy my chili beans at the supermarket! I had looked, many times, in cook books and on the internet trying to find a recipe, to no avail. Here is how I do it now. They are really delicious!
How to prepare the beans
For 8 pints of home-canned chili beans, you will need 2 pounds of dry kidney beans.
Sort and wash them well. Drain. Place in a large glass or stainless container and cover with water, at least half again as deep as the level of the beans. Add 2 Tablespoons of freshly squeezed lemon juice or apple cider vinegar.
Allow to soak for 24 hours. Drain. Rinse. Cover again, as before. Allow to soak for another 24 hours.
Drain and rinse. Cover well with clean water and bring to a boil. Boil gently for 30 minutes, skimming off the foam that rises to the surface.
When you fill your pint jars for canning, fill them only about 3/4 full of beans and top off with the cooking liquid or boiling water. Leave 1 inch head space at the top.
To make seasoning:
Combine all the seasonings and mix thoroughly. Store in an airtight glass jar.
Add 3 teaspoons of the seasoning mix to each jar and 1/2 teaspoon salt.
Process in a pressure canner for 75 minutes at 11 pounds pressure.
If you are not familiar with canning, please don’t be afraid, but do consult an authoritative source on canning. I recommend this book: Ball Blue Book Guide to Preserving
A versatile and perennial favorite! Wonderful in burritos, tacos, tostadas and as a dip for fresh vegetables or home-made chips. We make ours from home-canned pinto beans so that it is quick and convenient, eliminating the time-consuming careful soaking and cooking each time. Never again need you purchase refries in a can, running the risks associated with BPA metal can lining.
In a cast iron skillet, melt the lard on medium heat.
Pour in the jar of pinto beans, including the liquid. Add the salt and spices.
Using a metal potato masher, thoroughly mash, and continuously stir the beans.
When they are mashed to your liking, continue to stir and scrape the pan with a spatula, and cook the beans until they are as thick as you like, keeping in mind that as they cool, they will thicken.
Serve warm. May be refrigerated for up to a week or frozen for later use.
Another advantage to this method is that you can buy your beans in bulk, thus saving money, and won’t have to worry that they will get too dried out during long storage.
A note about the home canned pinto beans ~ if you’ve never done this, it is very easy. You do need to have a pressure canner to process them. I soak my pinto beans for 2 days, changing water 3 times during that process. Then I simmer them for 30 minutes, skimming off the foam, fill the quart jars leaving 1 inch head space, cover with boiling water, and process for 90 minutes at 11 pounds pressure. Please do not attempt this without consulting a reliable book of instructions on home canning. I recommend the Ball Blue Book Guide to Preserving.
Looking for a way to sneak fresh squash into your family? This dish can be served as either as a dessert OR a dinner entree. Yup, it tastes that good.
Puree all the ingredients together using a food processor, immersion blender, or hand masher.
Fill 2 8×8 pans with the mixture.
Bake 350* for 45-60 min.
Serve warm or chilled.
FREEZER OPTION: This dish freezes great. Store uncooked in ziplock bags or pie-pans. Thaw and cook as directed.
AVOIDING DAIRY? DON’T HAVE CREAM CHEESE? This dish still tastes good without it. Just omit and enjoy.
Not something for everyday, but fun for a kid birthday party, or when you just have an old craving. These tater tots are made a healthier version by using sprouted flour to bind them and friend in good ol’ coconut oil (of course you could use a rendered animal fat to fry in if you have it on hand). Enjoy these served with lacto-fermented ketchup for a probiotic treat!
Preheat an over to 350 degrees. Place potatoes in the oven and bake for about an hour, or until a knife can easily be inserted. Allow potatoes to cool.
Peel the potatoes and discard the peel. Push potatoes through a ricer (if you have one), otherwise, just mash as best you can with a fork, taking care to remove lumps.
Add arrowroot, flour, cheese, egg and salt. Stir to combine.
Knead the mixture with your hands until it forms a soft dough. Cover and let rest for 15 minutes.
Divide the dough into 4 sections and roll each section into a rope about 1 inch thick. Cut the ropes into 1 1/2 inch long pieces.
Heat about 2 inches of coconut oil in a heavy bottomed pot to about 350 degrees. Carefully add about 1/3 of the tots at a time to the hot oil and fry until golden brown. Carefully stir gently to turn the tots. Remove from oil and allow to drain. Repeat with remaining tots.
Sprinkle with additional salt and serve warm.
To freeze, place fried tots on a cookie sheet and freeze until solid. Place in storage container. Reheat by baking at 350 degrees for about 15-20 minutes.
If you’re craving a delicious (and nutritious!) bread pudding, this is a great way to sneak in extra veggies to your family … while doing it grain-free!
Pre-heat oven to 325*F.
Toss carrot, apple, eggs, honey, and lemon juice in a large bowl.
In a small bowl, mix almond flour, baking soda, and salt together.
Mix dry ingredients into wet ingredients. It will resemble “slop.”
Pour into a greased 8×8 dish.
Bake at 325*F for 40 minutes.
Delicious served warm or cold.
NOTE: You can also make this in a loaf pan.
NOTE: This is delicious served for breakfast the next day!
Making your own refried beans (consequently, this recipe never fries the beans) is too simple for words. So skip the phytic acid-layden, BPA-contaminated, bad-salt-filled, canned beans and make a batch of these. Besides the many health benefits and superior flavor, making your own is so much cheaper. Also, they freeze well, so why not stock up?
Place beans in a large bowl. Add whey or lemon juice and fill with filtered water. The beans will greatly expand, so be sure to use plenty of water. Stir, cover, and let soak 12-24 hours.
When you’re ready to make the refried beans, the beans should be nice and plump, some of them splitting apart, from soaking. Goodbye phytic acid, hello, phtase, the happy enzyme that helps us digest and absorb the nutrients! Drain and thoroughly rinse the beans. Place them in a large pot and add filtered water; just enough to cover the top of the beans. You can always add water if needed, but too much water will give you soupy beans.
Place lid over beans and bring to a boil. Remove lid and skim off any foam. Now, you can either saute onions, pepper, & chili in some butter or oil (it will yield a yummier flavor), or just add the onions, pepper, and chili straight into the beans if you’re short on time (like I usually am 90% of the time).
Stir, cover, and simmer for 2-4 hours. You’ll know the beans are ready when they start to fall apart (as seen in picture number three, below).
If there is still too much water, you can skim some off. Add garlic and salt. Then, either use a potato masher or a hand-held blender to turn them into refried beans. I store them in wide-mouthed, quart-sized mason jars and use these handy dandy lids. Be sure not to over-fill the jars if you plan to freeze them. I’ve done this… more than once, and you’ll end up with a cracked jar.
Versatile nutrition filled meal! You can make this sweet to very spicy depending on your choice of sausages and spices. Feel free to use other veggies in place of the cauliflower as well. A great post workout meal with good carbs and protein.
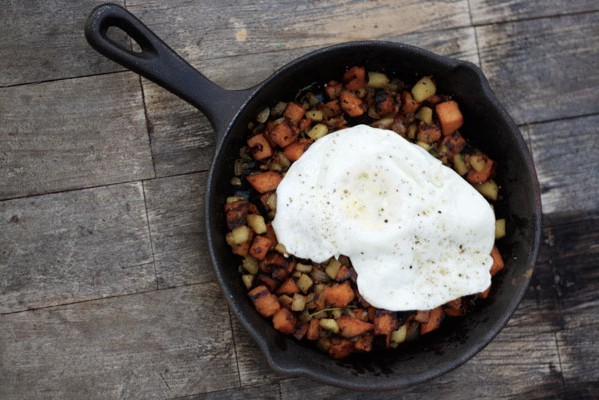
Remove casings and brown and crumble sausage in pan. While the sausage is browning, chop sweet potatoes, cauliflower and onion as small as you like. Put chopped ingredients into large bowl, add 2 eggs, season to your liking (I tend to like things quite spicy, if you don’t want any spice, omit Cayenne and use a mild curry powder). Mix your ingredients in your bowl, then add them to the pan with the sausage. Stir well, and let cook until the onions are cooked and the sweet potatoes are soft.
When summer is here and the garden is in full swing, you can sometimes get overloaded with eggplant. After using your three favorite recipes a couple of times each, you need a new plan. Here is a primo suggestion for enjoying eggplant today or saving it for winter. These are roasted eggplant cubes that serve as a side dish with beef, top a salad in fine style, or get dropped in one of your homemade soups just before serving time.
Cut the eggplant into 1″ cubes and place in a bowl.
Sprinkle on the salt, garlic, and oil.
Toss well and allow to sit for 30 minutes for the flavors to blend.
Spread cubes in a single layer on a cooky sheet. A little space between the cubes allows for better roasting.
Roast at 450-475 degrees for about a half hour. Time can vary depending on climate and the density of your eggplant. Toss the cubes a couple of times during the roasting process. Roast until the cubes are brown and the insides creamy.
Serve hot or at room temperature.