This is so simple and with only one needed ingredient (no starter cultures needed, although some cream and salt and pepper would make it even better), and only a little time, I’m not sure this can really be a recipe. But once you make it you will never want store bought cottage cheese again. At the end of the week we normally have anywhere from 1/2 to a 1/4 of a gallon of our raw milk left, I use this milk to make the cottage cheese, everyone in the family looks forward to it.
Please visit the blog link to see step by step pictures of the process if you need them.
Take your milk and pour it into a glass bowl, cover with a tea towel and let sit until the milk has thickened. This should take about a day to two days depending on the temperature of the room and how old your milk is. You can remove the cream from the top, or leave it there and when the milk is ready you can spoon the cream off the top and have sour cream.
The milk should look like yogurt when it is ready. When you put a finger in the milk it should hold the cut. Another way to know if it is thick enough is to place the back of a spoon on the edge of the bowl and press down on the curd lightly. If it pulls away from the side of the bowl without filling the spoon it is ready. But you don’t want it to sit so long that the whey starts to separate from the curd. When it is ready, pour the milk into a sauce pan and set to low.
With the milk on low, stir gently, don’t worry about keeping the curd in one piece it will not stay together and it will need to break apart at some point. Keep it on low, stirring often until the curd releases the whey. This shouldn’t take too long and you will want to keep an eye on it, it should take 5-10 minutes. You will know when this happens because the curd will sink to the bottom and the whey will be on top. When you start the cooking the milk, the whey will start to separate, but as it keeps cooking whey will rise to the top and you will see a definite difference in the look of it.
Once the curds and whey have separated line a bowl with a tea towel or a few pieces of cheese cloth. Pour the curds and whey into the lined bowl and then hang the towel. I put the towel under my stack of dishes. It is not recommended to hang it on your cupboard doors as this can cause the doors to start hanging crooked.
Let this hang until the whey has all dripped out. This can take a while if you just want to let it be, or you can rush it along by squeezing the bag. I find that giving the cloth a few squishes when the whey starts to slow down helps speed up the process also. I let it drip until it drips every couple seconds. This could take 5-15 minutes (if you squish the bag), to an hour or longer if you just let it be.
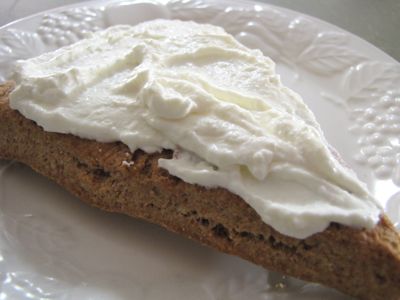
When the whey has been dripped out the curd is solid but not absolutely dry. You should still feel moisture on the curd. Once the whey has been dripped out, crumble the curd into a bowl, if you are going to eat it right away, or a container to store it in for later.
You can leave it how it is and eat it without cream, or use it in lasagna. Or you can add the cream and salt and pepper to taste. I use about a half a cup of cream per half gallon of milk used, but add how much you like.
A couple extra notes: You can save the cream from the milk you use to put on the cottage cheese when done, or use fresh cream. Because the whey has been heated it does not work well for soaking grains, but you can use it in bread, compost, or for watering the garden.
*It MUST be raw milk, pasteurized milk does not contain the needed enzymes and bacteria, and you will only get sour, spoiled milk. I like to use milk that is about a week old as I find that it gives the best flavor in a reasonable time.
If you brew milk kefir on a regular basis, you will probably end up with extra kefir. When you have more than you can use, here is an easy way to make kefir “cheese.” It is a great replacement for sour cream and cream cheese.
You will need either a cotton or linen bag, or cloth to drain the kefir.
Pour the milk kefir into the bag and suspend it over a bowl to catch the whey that will drip out.
If you don’t have a bag, use a cotton or linen cloth and tie up the ends with a piece of string or a rubber band.
Let the kefir drain for a full 48 hours, then transfer the kefir to a glass container with a tight lid.
Store in the refrigerator.
Save the whey that drains out in a glass jar with a lid in the refrigerator. This live whey is very handy when soaking grains or legumes or starting lacto-fermented veggies.
Once a week, stir the cheese and it will keep fresh for many months.
Quark is a type of fresh cheese. It has a very smooth and creamy texture and is slightly sweet (unlike sour cream or yogurt). It is used in baking (cheesecake), cooking (Pierogi), as a dip with herbs, or most popularly as a dessert with fresh fruits or berries - mmh, yummy. If you do not know what I am talking about, you most likely have not had any quark yet, otherwise you would remember this unique and very delicious taste.
Even though quark is very popular in Europe, it is hard to find in the US or Canada. The good news is that it is very easy to make.
General Information
Quark is a cultured milk product. If you have access to real milk that thickens on its own, you do not need the buttermilk starter. Go to step 2 and proceed with the Junket. Most of us however don’t have access to real milk; all we have is pasteurized store bought milk and cultured buttermilk. Out of those two: milk and cultured buttermilk, we can make quark. To save money I make my own buttermilk first, and make quark out of it. For the very first batch, you can skip step one altogether and go to ‘Making Quark’. Just use the HINT to make more buttermilk.
Making Cultured Buttermilk
Combine about 4 cups of milk with about 1/3 cup of cultured buttermilk in a glass jar. Mix well and cover loosely. Leave about one inch room at the top. It tends to rise while thickening. Place in a warm place. In the winter a kitchen cabinet that has a heating shaft underneath is perfect. You can also use a dehydrator or an oven with the lights on. After a few hour - up to to a day (depending on the temperature) the milk will thicken and turn into cultured buttermilk. Now you can take some out as a starter for the next batch of cultured buttermilk. HINT: Whenever you empty a buttermilk package, just refill it with milk, shake it, and place in a warm place and you will have buttermilk again. Cultured buttermilk is great as a cool healthy drink, for baking, and for making quark.
Making Quark
If you use a very warm kitchen cabinet, or a dehydrator for the first step, you can go to step two without even checking it. After a few more hours the buttermilk will thicken and separate itself from the whey. This is again depending on the temperature, warmer will go faster. If after 24 hours you only have buttermilk then your place is to cold. Use the oven, setting it to the lowest heat you have. Do not overheat! In the oven, buttermilk can turn into quark in two hours. Watch it until you see it separate.
Now fill the quark into a cheesecloth and put it in to a colander or hang it till all the whey has drained out. There you have it, homemade quark!
There are several ways to make mascarpone cheese. Commercially a sort of quick mascarpone is made by using tartaric acid to separate the curds from the whey, but this results in a grainy texture and, more importantly, no active cultures! Some recipes call for a mixture of cream and whole milk and then draining the whey to get a thicker curd, but I am going to share the absolute easiest way to make mascarpone cheese that can even be made with raw milk.
Mascarpone should be silky smooth, thick and rich with a slight tang. It’s super simple to make your very own and you can use it to top pancakes, waffles, dip fruit in, or make your own authentic tiramisu or cannolis.
Place cream into a quart sized mason jar. Add the kefir. Cover loosely and allow to sit at room temperature for 24 hours. After this time you should have a thick curd that should not need straining. If it’s too runny, feel free to drain some whey out.
If you used a lighter fat content cream (or half cream and half milk), you may want to strain your curd in some cheese cloth for a few hours to let some whey drain out.
Refrigerate and enjoy! This will keep for a few weeks. 🙂
NOTE: You can also make this by using creme fraiche in place of the kefir if you have it, but I really like the flavor of the kefir mascarpone and think it makes a thicker cheese.
A super easy, versatile and tasty cheese — use in salad dressings or dips, in place of cream cheese, or spread on toast.
Put the milk in a half gallon or gallon size jar. Sprinkle the mesophilic culture on it and stir in with a wooden spoon.
Put the 1/4 cup of water in a little jar or cup. Add one drop of the double-strength liquid rennet. Stir well. Take one tablespoon of this solution and add it to the jar of milk. Stir well. (If using regular strength liquid rennet, mix one drop of it with the water, but add 2 tablespoons of the solution to the milk and stir well.) This solution will keep in the refrigerator for one or two weeks. If it smells disagreeable, toss it. (It will smell like nothing when it is still good.)
Cover the jar of milk with a cloth napkin and secure with a rubber band. Let sit out at room temperature to culture for 24 hours.
Place the colander inside a pot or bowl. Make sure it is big enough to catch up to a quart of the whey that will drip out. Layer two pieces of 90 thread count cheesecloth in the colander.
The milk should now be thick and gelled, much like a firm yogurt. Transfer these curds into the cheesecloth. It is okay if they fall apart. Do it gently, but don’t be concerned about keeping them all in one piece.
Tie up the opposite corners of the cheesecloth, making a bag to enclose the curds. Lay the ends of the cheesecloth on top of the bundle of curds in the colander. Don’t let the ends of the cheesecloth hang out of the colander, or the whey will drip down into a puddle on your counter.
Leave this setup out at room temperature for 24 hours, during which time the whey will drip out and the curds will thicken. You can do this in the refrigerator if you prefer a less sour cheese.
Untie the cheesecloth and check the consistency of the cheese. Let it hang longer if you wish the cheese to thicken more. At this point, it is usually spreadable and soft, thicker than mayonnaise but not dry.
Transfer the cheese to a clean bowl.
Optional: Add 1/2 teaspoon of sea salt. Stir. Adjust amount of salt to taste. Refrigerate.
Save and refrigerate the whey that drips out; it may be used in lacto-ferments.
One of the things I hope to accomplish with this blog is to make it easy and common place to have cultured foods as part of your everyday life. Let’s face if it is to hard or complicated most people are not going to do it. So If I can teach you a few things to make life easier, hopefully you will start making and enjoying these life giving foods. Making kefir whey and and cheese is something I do many times a week. It doesn’t take long and will cultured a multitude of foods. Kefir has so many probiotics, at least 30, and that does not even account for the good yeast that you get too. So grab your kefir, a bowl and a coffee filter and we are ready to begin. Easy, I promise.
Place a basket style coffee filter in a strainer and place the strainer in a bowl.
Pour prepared kefir into the coffee strainer. The bowl will catch the whey which is the liquid that will drop through the filter.
Cover and place in the fridge overnight. I normally get about 1 cup of whey and 1 cup of kefir cheese out of 2 cups of kefir.
The next day you have a beautiful lump of kefir cheese in the filter.
Remove the cheese from the strainer and save the whey that has dripped into the bowl for making fermented drinks or cultured vegetables by placing the whey in a glass jar in the fridge.
You can use the cheese immediately or place it in a airtight container in the fridge.