Roasting a whole chicken is easy and very customizable. And the best part is that you can use the inedible parts to make a delicious stock. So when I roast a chicken, that means I can either do easy salads topped with chicken during the week, or I have the perfect base for a chicken soup (also very customizable!).
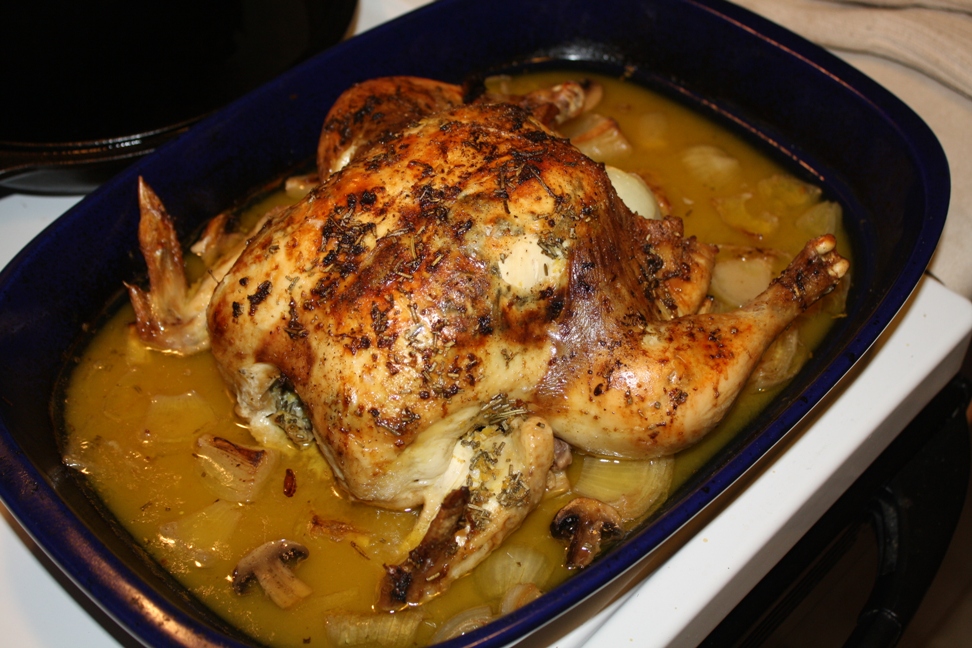
Zest a lemon or two and chop up most of the rosemary. Add it to some softened butter. Add the pepper to the butter. If using unsalted butter, add a pinch of salt.
Remove any organs / neck that came with the chicken. Wash the (thawed) chicken under cool water, inside and out. Place it in a baking dish (or 9×13 pan).
Slather the chicken with the butter, including the extremities and crevices. If the bird is cold, the butter will harden up - in this case it is better to do small quantities of butter at a time.
Slice the lemons in half and juice them over the chicken. Best practice: use a lemon juicer so you don’t have to worry about seeds. Stuff the lemon halves and the remaining rosemary into the cavity.
Chop one large or two small onions into large chunks and tuck them in around the chicken, adding one or two chunks to the cavity. I put about half a cup of water in the pan just to make sure there is plenty of moisture available.
Roast at 400*, roughly 20 min per pound of bird, until a meat thermometer reads 170* in the thickest part of the meat. Check it every hour or half hour, and if (when) it starts to get too brown, cover it loosely in foil.
Remove from oven and let stand for 10 minutes.
I love curry, and I make it as often as I can. This recipe is quick and easy and tastes so good. This recipe does have a good kick. Serve this with your favorite pita or flatbread and soaked brown rice.
In a Dutch oven heat oil, add onion and cook until tender a slightly golden brown. (2-3 min)
Add red chili and cook until tender.
Add ginger, cilantro, bay leaves, and curry powder continue cooking.
Add beef to curry mixture and cook until browned.
Add tomatoes, and chicken stock deglazing the brown bits off the bottom of the pan.
Stir in the lentils and simmer on low for 30-40 minutes, stirring occasionally.
After having some great (but not very healthy) Nachos Grande at a local restaurant, I decided to try to create a healthier version at home. It’s a pretty versatile recipe, so mix it up with whatever you have on hand. I’m sure peppers, corn, and olives would all be great in it. I like to use up beans and meat leftover from previous meals too, which makes for endless combinations.
Saute onions and garlic in butter until translucent. Add meat and homeade taco seasoning and cook until meat is browned. Next add tomatoes and beans and cook until warmed.
Preheat the oven to 350. Then spread 1/2 of the tortilla chips in the bottom of a 9X13 pan. Pour 1/2 of the meat mixture on top. Cover with 3/4 cup of cheese. Repeat layers. Bake 10-15 minutes until cheese is melted.
While the casserole is baking, mash the avocado with the fork and mix with the lactofermented salsa.
When casserole is done, top with shredded lettuce, guacamole and kefir/sour cream. (You could also serve any of these on the side, if you happen to have any picky individuals at your house like I do at mine!)
Gluten-free, dairy-free, egg-free, night-shade free…perfect for those with allergies or just wishing to avoid a particular food group. While the ingredient list is a bit long, it is actually simple and quick to put together, and has a wonderful flavor! The recipe can easily be doubled or tripled to feed a family.
Place cashews and water in a blender with next 5 ingredients and blend for several minutes until smooth. Strain, set “milk” aside and stir solids together with chicken and 1/2 tsp. salt. Divide this filling mixture among the tortillas, roll up, and place into a greased 7×9 pan.
Heat coconut oil and add arrowroot until bubbly. Slowly add chicken broth, cumin, and “milk” from the cashew mixture, heating until thick. Pour over enchiladas and bake at 350 for about 20 minutes, until hot and bubbly.
Black-eyed peas are often only served for New Year’s, but they are super tasty and nutritious legumes that are underplayed and under appreciated. This spicy dish uses summer produce to give new life to these legumes. Forget about serving baked beans at your next picnic or barbecue! These black-eyed peas with bacon are a better real food alternative to those sugary beans.
Rinse and sort the black-eyed peas. Place in a bowl and cover completely with very warm water. Stir in baking soda. Cover and allow to soak at room temperature 12-24 hours. 24 hours is best and placing in the oven (turned off) will keep the water warm for better soaking. Soaking your black-eyed peas this way will reduce anti-nutrients, increase mineral absorption and eliminate “digestive responses.”
In a large pot, cook the bacon until it’s crisp (or try this method for baking your bacon). Remove bacon, chop or crumble and set aside. (Have you ever considered making your own bacon at home? It’s super easy.)
Saute onion in bacon fat for about 3 minutes. Then add the garlic and chili and saute another minute or two.
Add the peas, diced tomatoes, salt chili powder and chicken stock.
Bring to a boil and skim off any foam.
Reduce heat. Cover and cook over medium heat for about 45 minutes. Check to see if the peas are tender. If not, add a little more water and cook for an additional 15 minutes or so. There should not be much liquid and the peas should be creamy and tender when finished.
Pour the peas into a serving dish and sprinkle crumbled bacon and chopped scallions on top. Even tastier the next day! The kids gobble it up.
*If you do not have fresh tomatoes or Anaheim chilies, substitute a 16 ounce jar of diced tomatoes and 4 ounce jar of green chilies.
Lasagna is a favorite around here even though it isn’t made often. Why? I’m not really sure, because it is really rather simple, even when making everything from scratch. This recipe has the perfect balance for me. Not too much sauce or cheese plus it holds together well when taken out of the pan.
6-8 hours before you are ready to make your lasagna prepare your dough. Mix the flour and whey add about 1/2 cup water and start mixing. Add more water as needed until a smooth but stiff dough is formed. Let sit 6-8 hours.
At least two hours before you plan to eat start rolling out the pasta to dry. (If you have pasta already made you will only need 1 hour)
Roll out pasta to the thickness of a dime cut into strips that are 2 inches by however long your pan is (in my case I make them 2 x 13 and 2 x 9 because I like to do one layer the long way and one layer the short way.) Let dry for about 1 hour.
While the pasta is drying get sauce and toppings ready.
To make your sauce place all the ingredients for the sauce in a pan and cook on low until it just starts to bubble. turn off heat and let sit until ready to use.
Cook the meat, add salt and pepper to taste.
Cut veggies.
(Start here if you already have your pasta made) 1 hour before you want to eat start putting everything together. Put a little sauce in the bottom of the pan to keep the first layer of pasta from sticking. Put one layer of pasta in pan add a 1/4 of the sauce and then 1/3 of the meat, mushrooms, peppers, and ricotta. Top with 1/4 of the of the mozzarella. Repeat with another layer of pasta, sauce, meat, mushrooms, peppers, ricotta, and cheese 2 time. By now the meat, mushrooms, peppers, and ricotta should be gone. Put on one more layer of pasta the last of the sauce and mozzarella, then top with Parmesan.
Bake at 350 for 30 minutes. Take out and let cool for 5 - 10 minutes before cutting and eating.
One of my favorite comfort foods growing up was chicken drizzled with ghee and roasted to a crispy perfection. This za’atar-pomegranate glaze adds a slightly tangy thyme-based flavor to it, making it simply delectable. Best of all, it’s a super simple glaze to add to your roasting routine!
Rinse and salt chicken: First rinse chicken thoroughly under running water, and apply salt generously to skin and rub in. Leave for 10 minutes and then rinse off the salt.
Add to pot with ingredients: I use my stainless steal strainer pot because it is deep, but you can use any pot that would fit the chicken and water without splashing everywhere while it’s boiling. Add filtered water, chicken, onion, mastic crystals, bay leaves, cardamom, salt and pepper.
Cook the chicken: Bring to a boil, then lower heat to medium and simmer for 45 minutes or so. During the first 20 minutes of cooking, remove foamy scum that rises to the top and discard. Use a meat thermometer to make sure the inside of the chicken has cooked and the internal temperature is over 165F.
Preheat the oven and prepare chicken: Preheat the oven to 375F on the broil setting. Meanwhile, take out the chicken from the broth and set on a baking pan. On one side of the chicken, evenly drizzle 1.5 tablespoons of ghee and 1.5 tablespoons of pomegranate molasses to cover as much of the exposed side as possible and evenly sprinkle 2 tablespoons of za’atar, 1/2 teaspoon of salt and a dash of pepper.
Roast in the oven: I prefer to roast the coated side first before flipping to add the glaze, so that it roasts evenly and the spices stay put when I flip the chicken. Roast one side for 10 minutes or so, then take out of the oven to glaze the other side. Flip the chicken, and repeat the same step as above with the same ingredients and measurements for the glaze. Place back in the oven to roast for another 10-15 minutes until golden brown. I like to spoon some of the melted ghee that has settled on the bottom on top of the chicken before serving, hot, next to roasted vegetables or a creamy soup! Enjoy.
Editor’s Note: You can substitute oregano for za’atar in a pinch, but it is definitely NOT the same. Make pomegranate molasses by reducing pomegranate juice over medium heat until it’s a a thick syrup.
Thin crepes are layered with crispy bacon, sauteed Crimini mushrooms, spinach and cheese and then baked to create a delectable casserole that is both pleasing to the eye and the tummy. My children do not like mushrooms and always balk at their spinach, but they happily ate (and asked for seconds) this casserole.

I made these with sourdough crepes from GNOWFGLINS eCourse, but you could use coconut flour crepes for grain free option.
Preheat oven to 350 degrees. Grease a 10 inch pie dish.
Cook the bacon until crispy over low heat to render out the fat. Remove from the pan and allow to cool.
Pour out all but 2-3 tablespoons of the bacon grease and save for another use. While bacon is cooling, add onions to the bacon grease, sprinkle with a pinch of salt and saute until translucent. Add chopped mushrooms and saute for 5 more minutes or until mushrooms have shrunk and are softened. Remove from heat.
Crumble the cooled bacon and add back into the pan. Stir in the chopped spinach. Taste and add additional sea salt if desired, but remember that you will be adding cheese into the layers so be careful not to over salt.
Place one crepe on the bottom of the dish and spread a heaping tablespoon or so of the mixture over the crepe. Then sprinkle cheese over that. Continue this layering until all crepes are used. Sprinkle the top with any remaining cheese.
Bake in the oven for 20 minutes. Cut into squares and serve warm (obviously there will be a couple of wedge shaped pieces).
To freeze: Layer the casserole as directed into a freezer-safe, oven-safe glass storage container and place in freezer. Bake frozen casserole with a lid at 350 degrees for 45 minutes to one hour. Remove lid 15 minutes before removing to brown the cheese on top if desired.

I call this my “meat lovers” pizza. It is delicious and satisfying. The caramelized onions add a lovely sweetness to the savory meat toppings. It gets rave review wherever I serve it!
Prepare your pizza crust and sprinkle the pizza pan with corn meal (adds a pleasant crunch but is optional).
Preheat the oven to 475 degrees F. and bake the crust for 6 minutes on a pizza pan or baking sheet. Remove from oven. This step will prevent the crust from getting soggy.
Peel and dice the onions. Peel and mince the garlic.
In a cast iron skillet, melt together the butter and olive oil on medium/low heat. Add the vegetables.
Saute the onions and garlic, stirring often, until the onions are very tender and browning nicely. These will be “caramelized” onions.
Move the vegetables to the outside edges of the pan and add the ground beef. Chop it up and cook, stirring together with the onions, until it is all browned, but not crispy. Season to taste with salt and pepper.
Drain the beef and vegetables well on paper towels.
Dice the bacon and fry it in the same pan until it is getting crispy. Drain well on paper towels.
Now it is time to assemble the pizza. The oven needs to be pre-heated at 475 degrees F.
Spread the sauce on the pre-baked crust to within 1 inch of the edge all around.
Distribute the meat toppings evenly all over the sauce.
Spread the shredded mozzarella all over the toppings.
Bake until the cheese is melted and beginning to brown a little. Start with 8 minutes in the oven and watch it carefully. Don’t let it bake until the cheese is brown all over… just until it begins to brown.
Remove from oven and cut into slices with a pizza cutter or sharp knife.
Allow to cool for 5 minutes and then serve!
This pizza may be assembled, carefully wrapped and frozen for later use. Allow to thaw at room temperature for 1 hour before baking.
When served with sprouted grain pasta, this sauce offers a nutrient-dense alternative to jarred commercial pasta sauces. It freezes well, too, and children love it!
In a cast iron Dutch oven or a heavy-bottomed large stainless steel pan, melt the lard and oil together on medium/low heat.
Add the diced onion and saute, stirring, for about 5 minutes.
Add the ground beef and garlic. Continue to stir and cook, chopping up the meat until the meat is all browned (not crispy!)
Add the tomatoes, tomato paste, Italian Seasoning, salt, pepper, soda and sweetener, stir well and bring to a boil.
Cover the pan and reduce heat to low. Simmer for 15 minutes.
This will nicely top a pound of sprouted wheat pasta.
This quick, springtime dish both nourishes, fills, and delights.
Prepare marinade by whisking together nama shoyu, wine, sugar, arrowroot powder, ginger, garlic, and curry powder. Add steak slices to it and allow to marinate for as long as 6 hours or as short as the time it takes to chop the vegetables.
Heat oil in large pan on medium-high heat. Using tongs, add the steak and cook about 3 minutes. Add vegetables, remaining steak marinade, and coconut milk. Cook, stirring constantly, about 5 minutes or until the vegetables are soft but still slightly crispy. Sprinkle cilantro and pine nuts over the dish. Serve by itself or over a bed of rice.
Homemade pasta may seem like a lot of work, especially ravioli, but for me the benefit of knowing what is in the pasta and how it was prepared is enough for me to take the trouble. It is also a great way to get small children interested and involved in cooking.
To Make the Pasta:
Place flour in bowl, make a well and add the whey, eggs and oil into the well. Start by slowly mixing in the flour pulling in only as much as needed. You will want a stiff but pliable dough. It shouldn’t stick to the counter or our hands but should be easy to kneed and not break apart while kneading. Add more flour if necessary or water if needed. (I keep a spray bottle of water on hand and spritz the ball if needed. This places the water evenly on the dough and makes it easier to work in.) After the dough is the right consistency kneed a few time to “smooth” Let sit for 6-8 hours.
To make the Filling:
Brown meat, add spinach until wilted. Turn off heat and crumble feta into meat and mix.
Divide into 3rds and roll out pasta to 1/8 inch thick and 4 inches wide. Place 1 tsp filling in the center of one half (look at the picture for a visual) about 1/2 in from short end. place filing along side 1/2 inch apart. Place a egg wash on half the short ends and length of pasta then between the filling, fold over the non filling side and press the pasta around the filing getting out as much air as possible. If there are large air pockets it can blow a hole in the pasta while cooking making the filing come out.
You can either cook right away or freeze for later.
To freeze:
Line a cookie sheet with parchment paper and place ravioli on sheet in a single layer and freeze. Once frozen place in a air tight container.
When ready to cook:
Bring a large pot of salted water to boil, remember there is no salt in the pasta so all the flavor will come from the water. How big the pot is and how much water will depend on how many you will be boiling. Place ravioli in boiling water and cook for 5 minutes if fresh about 7 if frozen. To check pull one out and tear off a little corner for al dente the center should be a little lighter than the outside, for fully cooked it should be the same color all the way through. If you need to make them in batches use a slotted spoon to remove the cooked ravioli to a strainer and place a pat of butter on them and toss to coat. Repeat as many times as needed.
Top with your choice of sauce or just a little butter and garlic.