A great snack that you can make pretty quickly and serve to guests. The fresh and mild flavor of the cheese is refreshing, especially on a warm day, but it can be eaten any time of the year. The sundried tomatoes and fresh basil give this appetizer it’s savory flavors while the cheese imparts the sweet notes.
The Cheese
Pour milk into a heavy bottomed pot and heat over medium heat. Raise the temperature to 195 degrees.
Slowly add in coconut vinegar, stirring constantly. The milk should maintain about 195 degrees. If you allow it to boil, the cheese takes on a ‘cooked’ taste.
Allow the mixture to simmer as you stir it. You will notice the milk begin to curdle.
Once the milk has curdled, remove from heat.
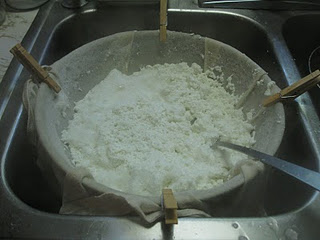
Pour the milk (now curds and whey) through a colander lined with butter muslin.
Pick up the four corners and hang it to allow all the whey to run out. (Or if you are impatient like me, you can squeeze it and burn your hands to get the whey out.)
The Goodies
Mix all of the goodies—the basil, sun-dried tomatoes, cayenne, olive oil and balsamic vinegar—in a bowl.
Add in the cheese, mix thoroughly and salt to taste.
If desired, mold the cheese by packing it into a small bowl greased with olive oil and refrigerate. Turn out on a plate when ready to use.
Keep covered in the refrigerator up to a week.
This is a great way to rescue a runny batch of homemade yogurt! It’s thick and smooth, and lightly sweetened. I love this, especially since I’ve never seen full-fat lemon yogurt in the store (which would be loaded with sugar anyways).
Place lemon juice in a saucepan and sprinkle gelatin over. Heat to boiling, letting the gelatin dissolve. Remove from heat and stir in honey, stevia, and natural food coloring if desired. Stir in yogurt and mix thoroughly until creamy and smooth. Pour into 2 quart jars, cover tightly and refrigerate until set. Enjoy with fresh berries, or I think it would make a great dessert with some whipped cream!
This makes a lovely breakfast or dessert. Healthy and only 200 calories!
In a small bowl add the strawberries, top with yogurt and then with honey.
**I discovered Manuka honey last year and love it. Manuka honey comes from an evergreen that grows in New Zealand. In it’s raw state it is very thick and creamy. It’s has a slightly smoky flavor and is a little less sweet than clover or other more traditional types of honey. Some Manuka honey is bioactive, meaning that is has antibacterial properties and is used as a treatment for wounds or skin infections when it has a higher bioactive rating. It’s also supposed to be good for the digestive system. Bioactive ratings range from 5+ to 30+. The higher the bio active rating, the higher the cost.
Save money by making your own yogurt.
Pour 3 1/2 cups milk into a saucepan and heat to 180°. Set a candy thermometer on the side so the bottom is 1/2 inch from the bottom, but still under the milk. It will take about 10 minutes, maybe 15, to get to that temp. Stir occasionally to be sure the milk isn’t sticking on the bottom.
Right in the beginning when it’s just started to heat, I do take a minute to fill a larger pan with ice and set in the sink. You will need this for Step 2.
Once it’s reached 180°, shut off heat (or remove if you have an electric stovetop) and place your saucepan on top of the pan with the ice in it. I then fill the larger pan with water so the ice will float to the top and surround the saucepan with hot milk as much as possible. If your pans are one size difference, it will help to “nest” them and keep that ice surrounding the slightly-smaller saucepan. Your goal is to drop the milk temp down to 105°.
Once it’s down to 105°, add 1/2 cup yogurt to the milk and stir – gently. Pour into a 1-quart mason jar and set in your yogurt maker – which is a fancy device that keeps your yogurt at an even, warm temp. Keep there 12-24 hours. I usually do mine overnight, so it’s about 12 hours, and I find that is tart enough for me to use without needing to add honey. If you leave it longer, it will get more tart (and will be better for you), but you may need to add honey to sweeten it up.
Delicious and versatile Ricotta can be used in many recipes, but the way I make it, it can also be sliced and used in sandwiches, etc.
Pour milk into heavy bottomed kettle. Bring slowly up to almost boiling (at least 200 degrees F)
Add 1/2 cup vinegar. Remove from heat. Stir briefly. Let rest for 15 minutes.
Pour into colander lined with a cotton cloth. Gather up the corners of the cloth, and using a large spoon, press the whey from the cheese curds.
Turn the curds into a bowl and work in 1 teaspoon salt.
While it is still hot, I press the ricotta into a bowl,cover with plastic wrap and chill in the refrigerator.
When cold, it can be sliced or crumbled to use.
Wrap carefully to freeze. It keeps nicely for several months.
This makes a great before-bedtime snack. It’s quick and easy, and healthy, too 🙂
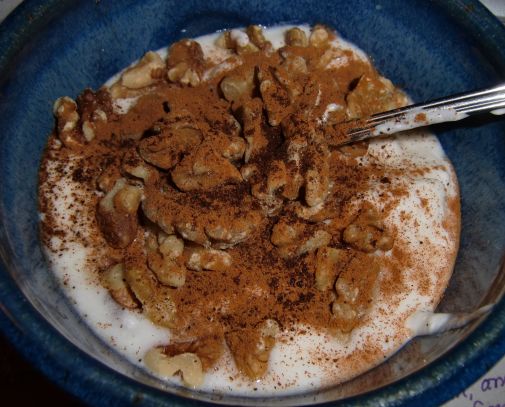
Scoop the yogurt in the bowl.
Top with remaining ingredients.
Stir.