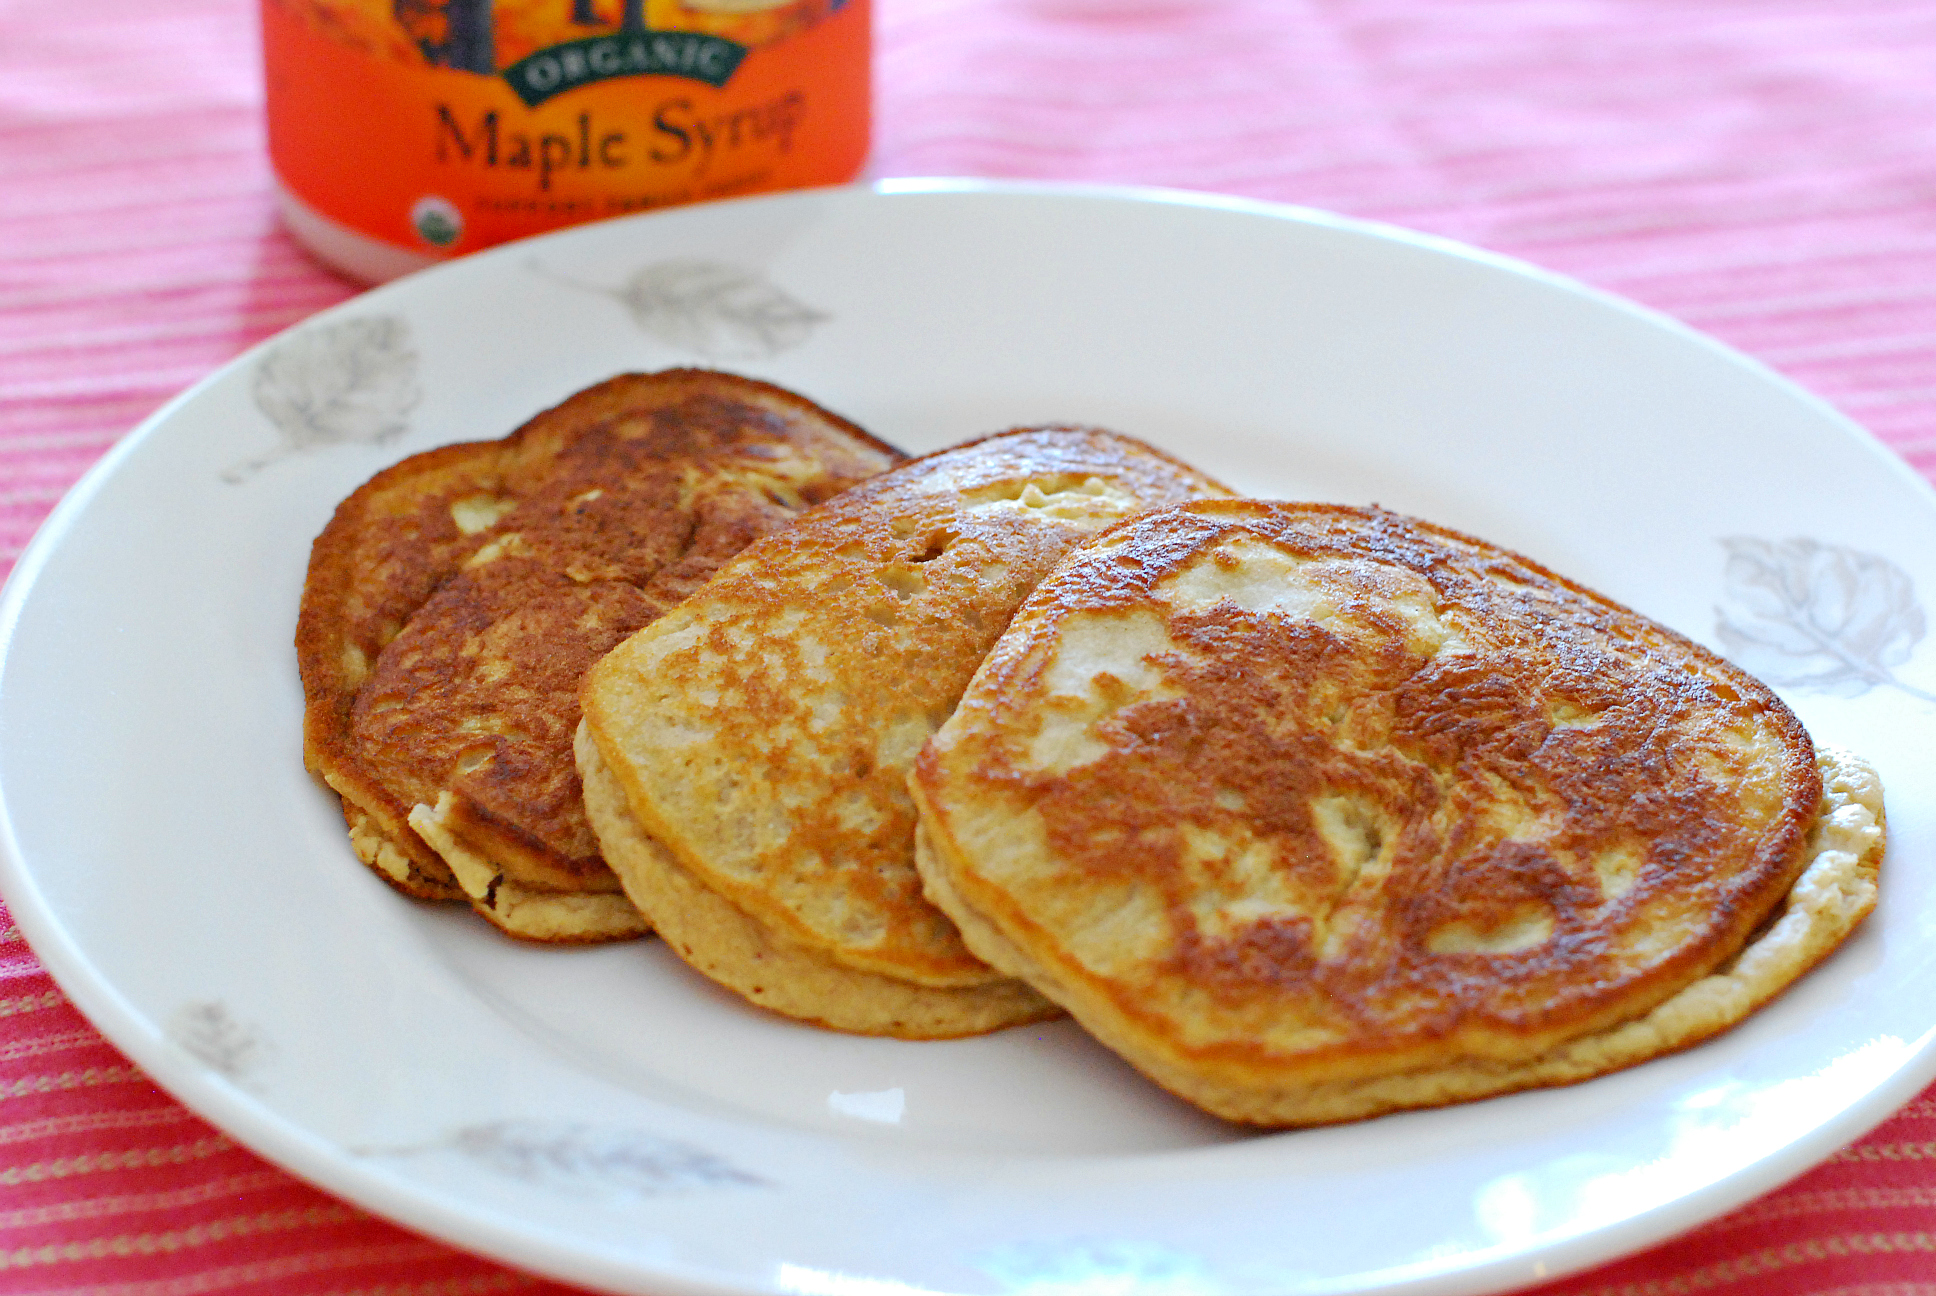
These pancakes are easy to make, and they are grain free, gluten free and dairy free. Coconut flour is much lower in carbs than normal flour, plus it’s high in fiber, protein and has some good fat to boot. These pancakes are fluffy but the texture is a little different than a normal wheat flour pancake.
Preheat a large griddle over medium heat (I use a cast iron)
In a medium bowl, whisk the eggs until liquid and frothy.
Whisk the coconut milk, vanilla and maple syrup (or honey) into the eggs.
In a small bowl sift together the coconut flour, baking soda and salt.
Mix the coconut flour mixture into the liquid mixture. The batter will be thick.
Melt coconut oil or butter in your pan.
Drop the pancake batter by 1/4 cupfuls into the pan, smoothing out the batter so that it won’t be too thick.
Cook until brown on each side and done in the middle.
Serve with real butter, honey, maple syrup, etc.
This is a great treat for breakfast or dessert. Make the batter the night before (for breakfast) or first thing in the morning (for an evening treat). The kids can’t wait until they are out of the pan to dig in. Serve with your favorite syrup, or warmed honey.
Mix all the dry ingredients and whisk together.
In a separate bowl whisk all liquid ingredients.
Mix the wet into the dry to make base batter, cover and rest for 6-8 hours (or overnight)
Before frying, In a cast iron skillet heat oil (lard) to 350 degrees.
Slice apples
To the soaked batter, add sparkling water (beer) and mix until they are combined.
Dip apple rings into batter, coat evenly.
Place rings in heated oil and fry until they are golden brown, remove from pan and drain.
Serve with warmed maple syrup, or honey.
My girls love waffles and this recipe has become our new favorite. These waffles are nice and fluffy with a soft interior and crispy outside, unlike many baked goods that are made with whole wheat flour that can be dry, dense and take some getting used to. Skip the syrup with these waffles and just pile high with fresh (or frozen and thawed) fruit and plenty of lightly sweetened whipped cream.
6-8 hours (or overnight) before you want to make your waffles mix your flour, dairy, and butter or oil.
When you are ready to make your waffles take out your waffle iron and plug it in. One with nice big indents is best for this kind of recipe (generally a called a Belgian waffle iron) but, any waffle iron will do. Separate your eggs and place the yolks in with the soaked flour mixture and place the whites in another bowl and set aside. Also add to the flour mixture your powder, soda, salt, and sweetener and vanilla, if using. Mix this all together.
Now take your egg whites and beat until soft peaks. This should only take a couple of minutes. The whites should all be bubbly and you should be able to see little bubbles all over. Once you have soft peaks add this to your flour mixture and fold in gently. The point here is to keep as many of those little bubble you just made in your waffle mix. Mix until you cannot see any more big patches of whites.
When your Waffle iron is nice and hot, (which it should be by now) add batter to your iron. I’m not going to tell you how much because all irons are different. For me it uses about the same amount as with normal waffles. You will have to experiment to see how much is needed. Cook until golden brown. Again this is different for all waffle irons you will have to experiment with yours to see how long. When done either serve immediately or if you like to eat as a family turn your oven on to 200 degrees and place them in a single layer on the oven rack to keep warm.
I have a sort of standard pancake recipe I use, but I am always playing with the ingredients and trying different blends to get that perfect pancake. If you are a fan of fluffy, super tender pancakes, then you’ll love this particular variety I came up with. The sweet almonds and nutty buckwheat are a match made in heaven.
Pour almonds, buckwheat and kefir (or yogurt plus milk) into a blender. Stir gently with a spoon to combine. Place lid on the blender and leave on the counter for 8-24 hours to soak.
The next day, add remaining ingredients to the blender and blend on high until smooth and thick. You may need to add a little more milk to blend it well, but don’t add too much. The secret to fluffy pancakes is having a thick batter.
Once blended, allow to rest ten minutes.
Preheat a well-seasoned cast iron skillet on medium low. Lightly oil it with coconut oil. Pour batter in the size you would like. Cook until edges look dry (about 3-4 minutes) and flip. Cook on remaining side. Remove pancake to a plate and keep warm in the oven. Repeat with remaining batter.
These almond flour crepes are slightly sweetened with a mild flavored honey. Almond flour crepes might seem like they would be too tender and fall apart easily, but they are actually simple to make and hold up well. You can even freeze them! Roll them, fold them and wrap with them. With only about a minute a crepe of cooking time, these whip up in a hurry for a nutritious breakfast, lunch or dinner.
Beat the eggs and salt in a bowl. Add honey and vanilla.
Break up the lumps in the almond flour with a fork and slowly add to egg mixture while beating to prevent lumps. Whisk in water enough to make heavy cream consistency.
Refrigerate batter for about 15 minutes to allow the batter to thicken somewhat. Reincorporate the almond flour.
Heat a 10″ cast iron pan on medium heat and brush with coconut oil. If your pan is well-seasoned, you should only have to do this the one time, otherwise brush with coconut oil as often as necessary.
Pour 1/4 cup of batter into the pan and quickly swirl around and tilt the pan to spread it. You may not make it all the way to the edge. That’s okay. When they are rolled up you can’t see the crooked edges. Allow to cook until set, but the top will still appear wet. It only takes about 45 seconds.
Work your spatula underneath and quickly flip the crepe. Cook on the other side another 10-15 seconds. Remove to a plate.
Stir the batter between each crepe. Repeat with remaining batter.
Stack finished crepes on top of one another to keep warm and flexible.
Serve stuffed with cultured Mascarpone cheese and top with stewed fruit. Or come up with your own stuffing and topping!
*Omit honey for a more savory crepe and stuff with eggs, mushrooms and spinach!
**Arrowroot flour is NOT necessary in this recipe and the crepes are still delicious without it. I just happen to think it makes them even better texture-wise. Omit for a GAPS legal recipe.
To freeze:
Separate each crepe with a sheet of parchment and freeze in air-tight container. Thaws in a few minutes on the counter.
Makes a moist, airy squash pancake with a phenomenal taste. Add lots of butter and berries on top!
In a medium size mixing bowl, add in squash and eggs and mix until creamy using a Hand Blender if you have one.
Then add in peanut butter, salt and cinnamon and mix until all ingredients are incorporated.
Lastly, add 3/4 cup water and mix. If it needs a little more water, add the last 1/4 cup in very slowly. It’s hard to remove water after its mixed in!
Use the following directions on how to fry the perfect pancake and enjoy! http://www.wellnesshammock.com/2012/05/how-do-you-fry-the-perfect-pancake/
Move over Eggo! 😉 These waffles are wonderful and simple to make. They freeze and re-heat well.
The night before, in a medium-sized bowl, combine the sourdough starter, sucanat, water and flour.
Stir well and cover. Let sit on counter overnight.
In the morning, add the salt, eggs, melted butter and baking soda and mix thoroughly.
Start heating your waffle iron. When it is good and hot, spray with pan spray, just for the first waffle, on both surfaces.
Scoop out 1/2 cup of the batter and pour it onto the waffle iron, close it and set a timer for 2 minutes. Then check to see how it is doing. Depending on your equipment, it could take 2 - 5 minutes.
When the waffle is nicely brown, using a fork, transfer it to a plate. Then continue baking the waffles, one at a time.
These take a while to cook, but once you figure out the time and temperature, you can set your timer and walk away and do other things while they bake.
These freeze well, and can be reheated in an oven or in a toaster.
This is a super-fast, easy breakfast that is chock full of protein and good fats! Serve with a bit of sucanat or honey for a special treat.
Preheat oven to 450. Place coconut oil in a 10-in. cast iron skillet and place in the oven to melt and heat up. Whirl eggs and coconut milk in the blender for about 30 seconds, until whipped and frothy. Add almond flour, salt, nutmeg and cinnamon and whiz for another 30 seconds or so. Pour into hot skillet and arrange apple slices over the top and sprinkle with cinnamon. Bake for 10 minutes, and then lower heat to 350 and bake another 5-10 minutes, until puffed and golden brown.
Aebleskivers are a traditional type of Danish pancakes that are baked in a special pan on top of the stove. They are spherical in shape and typically made with beaten egg whites added to make them nice and poofy. They are also typically made with white flour and rather sweet. My recipe uses a whole wheat sourdough, and so are nice a fluffy and served with real maple syrup ~ they are a delight! They don’t last long around here. Being made from sourdough batter, they keep well in the refrigerator and may be reheated.
You will need an Aebleskiver pan.
You will also need a skewer or a small knitting needle for turning the Aebleskivers over in the pan.
The night before you plan to make your Aebleskivers, in a medium-sized bowl, combine the sourdough starter, Sucanat, warm water and enough whole wheat flour to make the batter like very heavy cream.
Stir well, cover and let sit on the kitchen counter overnight.
In the morning, lightly grease and then begin heating your Aebleskiver pan over medium/low heat.
To the sourdough batter, add the eggs, salt, melted butter and baking soda and stir well.
Fill each cup in the pan half-way with batter, using a spoon.
Watch them carefully. When the edges begin to look done, and there are bubbles on top, carefully insert your skewer into each Aebleskiver near the edge (check photos on my blog for this) and flip them over.
You can check to see if the bottom is nice and brown also, and then they are done. Remove them using the skewer and place them in a bowl.
Serve warm with real maple syrup!
Aebleskiver Pan: You’re not limited to making Aebleskivers in these pans. Any sort of batter can be cooked up in this, really. Cake pops, anyone??
I love these pancakes for their simplicity, you don’t have to stand around flipping pancakes, but pour them in the pan and let them sit until done. You also don’t have to worry about soaking anything the night before, just scoop out some sourdough starter and add the rest of the ingredients to it.

Put a 12 inch cast iron skillet on low heat and add the 1 T butter for the topping plus the 2 T butter or coconut oil for the pancakes to melt. Thinly slice the apple while you wait for the butter to melt.
Put 1 cup of starter in a small bowl and when the butter is melted add the 2 tablespoons of melted butter to the starter. Swirl the remaining butter in the pan to coat evenly lay the apple slices on the bottom of the pan get them as close as possible but not overlapping. Next sprinkle the sucanant over the apples. Turn off the heat and then prepare the pancakes.
The pancakes are pretty simple, mix everything but the soda in a small bowl. Once combined sprinkle the soda over top and mix in quickly. It will bubble up and just about double in size. Turn the heat back on to low and pour the pancake batter over the top.
Let this cook for 5-10 minutes until the top starts to have a few dry spots. Turn the broiler on to about 350 degrees. When the dry spots appear place in the pan in the broiler for a few minutes until the top is dry and starts to brown lightly.
When done, cut into 8 wedges flip onto plate, to show the apples and eat. These are very good topped with fresh whipped cream.
You can use your favorite pancake recipe for this if yo don’t have any sourdough.
The pancake recipe is adapted from GNOWFGLINS.

These coconut flour crepes are simple to make and perfect little packages for a plethora of fillings or toppings. You could even use them as a wrap option for lunch! If you don’t eat grains, or just like to mix it up these are a great little gem to have in your recipe box. I sometimes whip up a batch for my kids to have as a snack along with fresh fruit and nut butter inside. Makes for a fantastic lunch option when I didn’t get around to baking bread. Fill with sweet or savory fillings, or simply fold in quarters and top with fruit sauce, preserves or compote.
Beat eggs well with a whisk until pale in color. Whisk in honey if using-I don’t usually add this because I like the option of using the crepe for sweet or savory dishes. Be sure your melted butter is not too hot and slowly drizzle it into the eggs while whisking.
Sift the coconut flour and arrowroot powder onto the egg mixture. Sifting is important or you will have lumps and the batter won’t turn out right. Whisk to incorporate.
Add enough raw milk or water to make the batter the thickness and consistency of heavy cream. Allow batter to sit for about 5 minutes. During this time the coconut flour will absorb some of the liquid. Add any additional liquid after this time if the batter is too thick.
Heat a well-seasoned 10-inch cast iron pan on low heat. Brush the bottom with butter or coconut oil. I usually only have to do this once, but if your pan is not well-seasoned, you may have to do it intermittently between crepes.
Pout 1/4 cup of the batter into the pan and swirl swirl it until the bottom is completely covered. Do not worry if it’s not completely covered or perfectly round. It can take a bit of practice to get the feel of it.
Cook the crepe until the edges appear dry, usually 1 to 2 minutes. Carefully loosen the edges with a spatula and flip the crepe. Cook for another minute or so on the opposite side.
Stack finished crepes on a plate to keep them warm and pliable. Repeat with remaining batter.
Store leftover crepes in the refrigerator in an airtight container. Freeze crepes by placing a sheet of parchment between each one and storing in an airtight container. Thaw by placing at room temperature or in a warm oven.
Crepe Souzette is a famous French breakfast or dessert made with the thin, French-style pancake called a crepe. The crepes are draped into a rich orange sauce that is traditionally prepared with orange juice and a liqueur and often au flambes. This is a real food version of that recipe sans alcohol to make it more kid friendly. The sourdough crepes add an additional flavor note that makes this dish really satisfy.

To Make Crepes:
Whisk together sourdough starter, melted butter, eggs and salt until well combined.
Whisk in the milk until you have the consistency of heavy cream. If your batter is too thick, your crepes will be too thick. Too liquid and they will not hold together well. If after your first crepe, you determine that the batter was too thick, add more milk; if the batter is too thin, add a little more starter.
I choose to always make a basic crepe and never sweeten my batter, but if you would like a more dessert crepe, you may add a tablespoon of honey to the batter.
Heat a well-seasoned 10″ cast iron skillet on Med-Low heat. Brush the bottom with a little butter or coconut oil. If you pan is seasoned well, you should only need to do this the one time. Otherwise, brush on oil as needed every few crepes or so.
Pour in 1/4 cup of the batter and swirl around the pan to completely cover the bottom. It’s okay is a little gets on the sides or if your crepe isn’t perfectly round. It will still be delicious. cook for about a minute or until the edges look a bit dry. Use a spatula to release the edges and work your way under the crepe and flip. It should not be difficult to flip. If it is, let it cook a bit longer. Cook for another minute on the other side. Remove to a plate.
Repeat with remaining batter. Stack finished crepes on top of each other to keep them warm and pliable.
Crepes can be made ahead of time and stored in the refrigerator. Simply warm in a cool over while your making the sauce. Crepes also freeze well. Allow to thaw at room temperature before peeling apart.
Crepe Suzette Sauce
Zest 1 of the oranges and set zest aside.
Juice the 4 oranges and discard peels.
Heat the butter and orange zest in a skillet over medium heat. Add the orange juice and honey and whisk until the honey is completely dissolved and the sauce is bubbling, about 3 minutes. Sauce should appear thickened a bit. If not, allow it to bubble a bit longer. Reduce heat and simmer for another couple of minutes.
Assembling the Crepes
Fold your crepe into quarters so it looks like a wedge. Using tongs, dip a crepe into the orange sauce, then flip it over to cover both sides with sauce. Place on a plate and repeat with remaining crepes. Drizzle any leftover sauce over the crepes.
Serve topped with whipped cream or homemade cultured Mascarpone cheese!
NOTE: The crepe recipe was adapted from GNOWFGLINS Sourdough A to Z eBook. If you want to learn how to make the most of your sourdough and learn other amazing sourdough recipes, check it out!
