Brain Food - Breakfast Skillet Inspired by the Wahls Diet
The Wahls Diet makes sure we are eating enough nutrient dense foods to not just fuel or bodies, but make sure they have the elements to build and repair cells particularly brain cells. This breakfast skillet insures you get the right fuel to your brain in the morning.
To check it out I am doing a month of the Wahls Diet. This egg breakfast skillet is the first recipe I have developed to front load vegetables to reach the goal of 9 cups of leafy greens, bright color and sulfurous foods.
Over medium heat in a large skillet saute the onions and peppers in half of the fat until the onions are glassy.
Add the cabbage and miso and continue cooking until the cabbage is starting to go limp.
Mix in the sun-dried tomatoes and greens give them a quick stir then push all the veggies to the edges. Melt the remaining fat in the now empty center of the skillet to coat. Reduce the heat to low and add the eggs. Cook the eggs in the center until just set. Sprinkle the seaweed flakes over the top and you’re ready to serve.
Gather up some of your summer bounty from the SCA or your garden and combine it into a delicious breakfast worth savoring any time of the day. Summer squash and tomatoes take a front seat in this vegetable breakfast hash. The hash is topped with eggs done any style (poached or soft boiled is best) to help you absorb the most nutrients from the veggies.
Heat a large cast iron skillet over medium heat. Add coconut oil and butter to pan. Add onion and saute until transluscent. Add garlic and saute another minute.
Add chopped squash and cook for 2 minutes.
Add mushrooms and cook for about 5 minutes or until almost completely done.
Sprinkle with salt (we prefer REAL Salt) and pepper to taste. Add dash of hot sauce. Add in tomatoes and spinach or preferred green and cook until greens are wilted.
Drain hash mixture and place on individual plates. Top each mixture with 2 cooked eggs per person.
Serve with a slice of fresh avocado!
My daughter and I came up with these one day after a conversation about how deviled eggs were one of our favorite ways to eat eggs. We decided that since they were so great, variations to a favorite had to be made. After a quick look in the fridge, we decided to make a green deviled egg using lime and cilantro. Man! Were they yummy! Even my not-a-deviled-egg-fan husband enjoyed them. I think he’s a convert!
Peel the boiled eggs and slice in half lengthwise.
Remove the yolks to a small bowl or food processor. Using a food processor will create a creamier egg with more uniform color like that pictured, but mashing and mixing with a fork is just fine.
Add remaining ingredients and blend well until mixture is smooth.
Spoon or pipe into the cavities of the white halves.
Garnish with extra cilantro.
Simple fast and hearty. A great dish for a busy weeknight or a filling lunch for a weekend.
Melt butter in a skilled on medium heat, add pre-cooked ham and heat through, browning lightly.
Stir in peas and carrots, heat through stirring often to prevent sticking, add more butter if needed.
Stir in rice and continue to heat as well. When everything is hot and cooked add raw scrambled eggs and gently stir until they are cooked.
Serve hot with soy sauce over the top.For vegetarian omit the ham.
This traditional Mexican meal is a great excuse to have breakfast for dinner. Using leftover corn tortillas makes this dish take zero prep time. I like to serve this with homemade refried beans.
Masa Harina is cornmeal that has already been soaked in limewater (sodium hydroxide+water) so you can easily make homemade tortillas with properly prepared grains. Just make sure you use non-GMO masa.
Deep Fry the tortillas: Heat up approximately 8 tbsp (enough to cover a tortilla) of lard or expeller pressed coconut oil in a pan. Grab a corn tortilla and dip it in the hot oil. Cook each side about 30 seconds. After cooking both sides until golden brown, remove to a paper toweled plate to remove excess oil. Fry the tortillas one at a time.
Make the eggs: using the same hot lard or oil, fry the eggs one at a time for 20 seconds on one side, then flip over and let fry for another 5 seconds, and then remove. The egg yolk needs to remain tender for this recipe to be at it’s finest.
Serve: Place two tortillas on eat plate, place an egg on each tortilla, and cover the whole of each egg with some cheese, then fermented salsa. Add a slice or three of avocado to each and garnish with a lime wedge.
So now that Easter is over, what are you going to do with all the hard boiled eggs you decorated? If you are like me there are only so many plain eggs and egg salad sandwiches you can eat. But Deviled Eggs are easy to make, and dress up plain boiled eggs. They also make great appetizers for any party and are great at any time of the year. You can easily make more or less as needed.
If where the yolk is positioned is important to you, store your eggs sideways in the fridge before you boil them. Also older eggs will peel better than fresh eggs. If you get your eggs from the store you shouldn’t have to worry about it too much but if you have farm fresh eggs try and use 3 day to week old eggs.
Start by peeling your eggs and then cutting in half.
Take the yolks out of the centers and place in a bowl. Place the whites on a platter with the yolk hole up.
After all the yolks are in a bowl mash slightly and add the mayo, mustard, pickle juice and salt and pepper. Mash this all as much as you would like, if you want to make them extra pretty and pipe them, make sure it is pretty smooth. If you are just going to spoon it in, a few chunks will be fine.
Once mashed, you can either place the yolks in a bag and pipe into the white or you can just spoon it into the whites. Make sure to start with less yolk, you can always go back and add more, but it is harder to take some of each and put into another.
When all are filled sprinkle with paprika.
Why risk whatever is in that large jar at the deli? It’s easy to make pickled eggs at home. As written, this recipe is mouth-searingly hot; be sure to adjust for your personal preference.
For the hard-boiled eggs:
Place the eggs into a pan large enough to fit the eggs and enough water to cover them, plus an additional inch of water over the top.
Cover with cold water, then, for each quart of water, add 1/2 teaspoon of salt, and one teaspoon of baking soda. The salt and baking soda should make the eggs easier to peel.
Cover, and place over medium heat and bring to a boil. As soon as the water is at a rolling boil, turn off the heat and leave the pot on the hot burner, and leave the cover on the pot. Set the timer for 10 minutes.
When the 10 minutes are up, drain the eggs, and fill the pot with cold water. This ostensibly helps to separate the shell and membrane from the white.
Peel the eggs using whatever method you find easiest.
For the brine:
In a medium pot, combine 2 cups white vinegar, 1/2 cup water, 1/2 cup sucanat, 1 teaspoon of salt, 1 teaspoonful pickling spice, 1 heaping tablespoon red pepper flakes, 5 whole cloves, 1 cinammon stick, 6 halved cloves of garlic, 2 hot peppers, and 1/4 onion.
Adjust the level of heat by using more or less red pepper flakes – the way it’s written here brings a high, intense heat.
Place over medium heat, bring to a low boil, reduce heat, and allow to simmer for 15 minutes.
After the 15 minutes passes, allow the brine to cool a bit, then ladle some of the brine and veggies into the bottom of a clean quart jar. Put in 3 eggs, then more brine and veggies. Then more eggs, then more brine, et cetera, until the jar is full to the neck.
Put on a lid, tighten it up, and allow to cool before putting into the fridge.
Now, here’s the hard part: Wait three weeks before eating.
You can push it to two, if you’re really, really impatient, but the longer you wait, the more intense the heat and flavor.
Curry spiced pickled eggs with the awesome side effect of a brilliant yellow. These not only look great but taste great too. Use as you would an hard boiled egg. Sliced on a salad, as and egg salad or eat by themselves as a nutritious snack.
Pack eggs into a quart sized mason jar. I was able to fit about 10 eggs in a jar. Sprinkle spices in as you pack the eggs. Cover with salt brine. It’s important to make sure the eggs are fully submerged using a weight. Cover tightly and let set for about a day. Transfer to the fridge and let marinate for few days to a week before serving. The longer they set, the more the color will leach in to the middle of the egg. I suggest using these within a month (if they last that long).
There is no need to use chemicals to dye your Easter Eggs. Dying your eggs with homemade vegetable dyes is an interesting, healthy, and fun way to enjoy this tradition with your family!
Hard boil your eggs, and allow them to cool completely. Make sure they are well dried before placing them into the dye baths.
Immerse the eggs in the coloring liquid to which you have added 2 Tablespoons of white vinegar (per quart of liquid) and put them into the refrigerator.
Go back from time to time and check on the color. When it is as you wish, then remove the eggs and discard the dye liquid. The longer they soak, the deeper the color.
After coloring, be sure to store your eggs in the refrigerator!
Onion Skin Dye Yellow to Gold
To make dye from yellow onion skins, place several skins in your pot of water. Boil them for a little while and allow the mixture to cool with the skins in the water. Then drain off the water to use for the actually dyeing. Add the vinegar. Put the skins in your compost. Soak your hard-boiled eggs in this dye bath and depending on how many eggs you use and how concentrated the dye bath is, you can get warm tones that range from gold to a lovely terra cotta.
Cranberry Dye Light Blue
To use fresh cranberries, boil 4 cups cranberries in 2 cups cold water until the berries burst. Let them cool. Drain and save the liquid. Add the vinegar. For a light blue, soak only a short time. If the eggs stay in very long, they will become dark gray in color.
Turmeric Yellow Dye
In a quart of water, simmer 1/4 cup of ground turmeric. Cool. Strain, add the vinegar and proceed.
Red Cabbage Blue
About 3/4 of a head of red cabbage chopped up will make a lovely blue. Again, cook for a while, cool in liquid, strain, add the vinegar and then dye your eggs.
Eggs pickled using lactofermentation! Not only do they look cool, they taste great too. Use juice from lactofermented beets to add color.
Stuff eggs in a 2 pint jar. Dissolve salt in the beet juice (add a little water if needed to dissolve salt). Add to jar. Add filtered water to cover eggs completely, leaving at least 1/2″ head space. Make sure eggs remain submerged and leave at room temperature for a day. Move to the fridge and let marinate for a few more days.
Why cupcakes instead of quiche? Well, cupcakes sounds yummier. Who doesn’t want to eat cupcakes for breakfast? These egg cupcakes are savory and light. The Gruyere and ham combo are amazing.
Preheat oven to 350 degrees and grease muffin tins (stainless steel or stoneware are best).
Whisk together eggs, cream, salt, nutmeg and cayenne pepper.
Fold in remaining ingredients.
Scoop 1/4 cup of batter into each tin.
Bake for about 20 minutes, or until eggs are just set in the middle.
Allow to cool in the tins for a few minutes before trying to remove the cupcakes.
*NOTE: For dairy-free and Paleo, leave out the cream and increase eggs to 12.
This GAPS breakfast recipe is suitable for Stage 4 of the Intro Diet and beyond.
One of the best parts of this breakfast is the “juice” left at the bottom of the bowl at the end – a combination of kimchi juice, cucumber water, olive oil, and egg yolk. Yum!
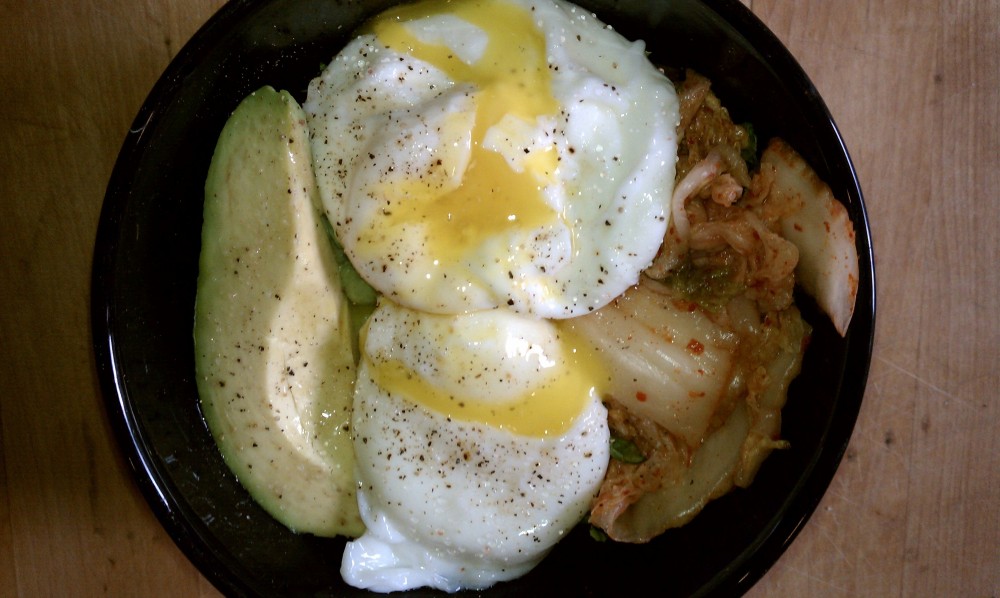
Put lettuce in the bottom of a bowl, then top with chopped cucumber.
Lay the avocado slice on one side of the bowl, then drizzle everything with a little olive oil. Place the kimchi on the other side of the bowl.
Place poached eggs in the center.
Add salt and pepper to taste.